Washing Your Motorcycle in Yerevan

Even if you buy a brand new motorcycle and drive it off the stand from the official dealer store, sooner or later it will require a good wash. Even if you are that one lucky rider who has never been caught riding under the rain during the last 25 seasons, even if your garage is more sterile than the 8th Hospital in Zeytun (hey it’s totally feasible!), and even if you take a shower every time before saddling it, if you’re riding it you’ll get it dirty (no pun intended).

Tsakhkadzor, about 500km after the purchase

Moreover, if you just love doing it in dirt and gravel, the need to wash it will rise a lot more often than if you’re one of those cafe racer dudes with a Fireblade.

And by often I mean pretty damn often.

Urtsadzor, dirts of Khosrov Forest

So what do you do when the time comes? You know, when the rear suspension doesn’t work anymore because of all the dirt, the leather saddle and the handlebar grips conveniently stick to your pants and gloves like a candy, the turn signal button no longer works because of all the sand around, the mirrors show a blurred vision of a drunk person distantly resembling the reality behind you and she suddenly comes up with all these different reasons why she does not want to ride today? From that point (as well as from any ride that is more than 300km in Armenia) you have two options.

Option number one

Wash your motorcycle. Get some water running (better warm than cold), some dishwashing liquid detergent, a sponge and a bucket.

  • Make sure the engine is not very hot
  • Start with splashing buckets of water to essentially get the motorcycle very wet
  • Spray the running water and try to get off as much dust and dirt by spraying as possible
  • Get more water in the bucket and soap it using the detergent
  • Starting with the top (the mirrors), go down sponging and soaping all the parts, taking care of the dead bugs and paying attention to every detail. Avoid rubbing the sponge against big pieces of dirt or sand, as this will scratch the paint.
  • Clean the motorcycle chain using a commercial chain cleaner available in many stores including Honda’s Yerevan Dealership
  • Rinse the bike using running water
  • Let the motorcycle rest for a couple of minutes
  • Dry it using a damp cloth
  • Lubricate the chain!
  • Go on a ride to dry off the remaining parts (enjoy)!

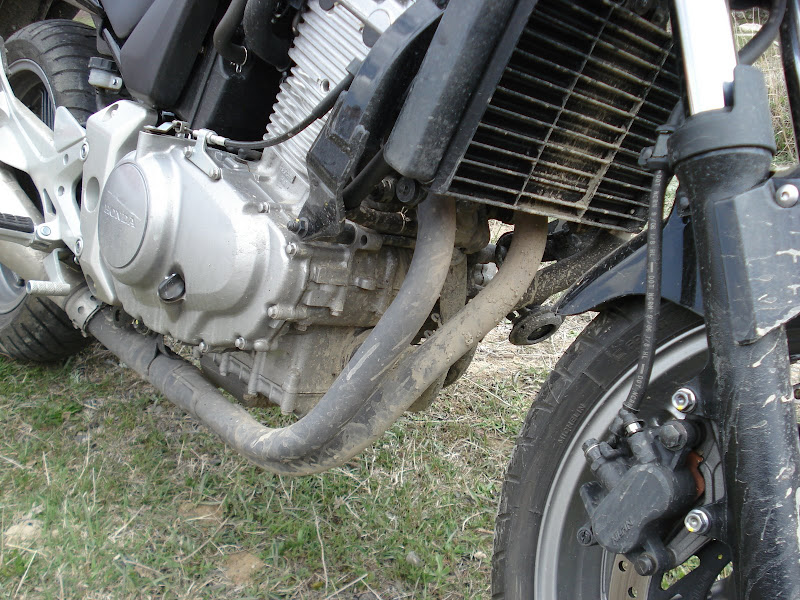
One thing to keep in mind is, do not direct high-pressure water on the carburetor, the front fork suspension rings or the engine radiator. These parts can easily be damaged by that.

Option number two

Have someone else wash your motorcycle. Many riders are feeling very strongly against someone else washing the motorcycle. Moreover, there is a shared belief that washing the motorcycle at a commercial no-contact car wash (aka “Karcher”) will damage some parts because of the extremely high-pressure water and air. However, in reality things are not so grim, if you take necessary precautions and warn the washer about some specifics.

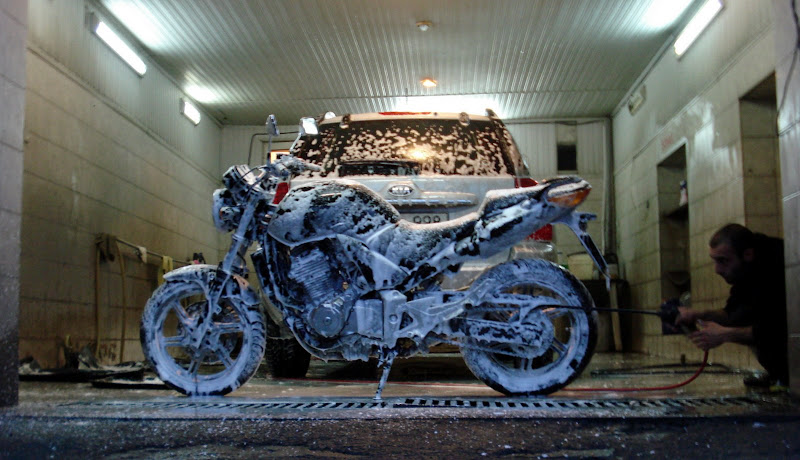
Commercial no-contact car washes have two big advantages:

  1. They do not accumulate any scratches to the paint, simply because pressurized air is used instead of a sponge
  2. They are quick

Warn the fellow to not direct the stream of water at the radiator, the carburetor and the front fork UNDER ANY CIRCUMSTANCES and always stay to supervise what’s he doing. Then pay your 2000 drams and get done with it.

I am personally going to this typical Yerevan car wash in a yard at Grigor Lusavorich street where a guy named Galoust (he’s in the photo above) has become my own personal bike washing expert. Here is where the place is located:


View Bike Wash in a larger map

Tell Galoust I said hi!

How to Store a CBF500 for the Winter in a Developing Country

Riding is fun, and in order to make sure the machine serves long and without problems, we need to serve it on our part. One of the cornerstones of motorcycle maintenance is proper motorcycle storage between the seasons. This step–by–step guide is aimed at helping those who can’t following the regular guides available online due to non–availability of certain required products in their area (like myself).

Doing all of this with the help of a friend in a well organized manner should not take more than half a Saturday, usually turning into a fun and unique experience, but most importantly your motorcycle is certainly going to appreciate the effort!

Step 1: Go ride

Take your motorcycle out on a short ride, preferably to the nearest petrol station. Ride for at least 15 minutes to make sure the engine gets warm and good, ready to change some oil. Use the chance to enjoy the last moments of riding to the fullest!

Step 2: Full tank

Fill the tank with petrol fully. Make sure the petrol station is credible for high-quality fuel, as the petrol is going to stay in the tank during the winter and if there is water in it then it is going to separate over the long period. Note that while most of the online storage guides suggest emptying the tank and using a tank spray to prevent its rusting, since you presumably have no access to luxuries like the spray the tank is better off being full than empty.

Some guides also suggest emptying the carbs before storage. I believe the carb is better off staying full and being emptied just before taking the bike out from the storage.

Step 3: Tire pressures

On the way back, check the tire pressures at any tire maintenance spot. Inflate both tires to the maximum pressure levels recommended for the motorcycle. Flat tires rot or get permanent dark patch spots that nobody wants to get.

Step 4: Clean and tidy

Dirt, mud, oil and dead bugs deteriorate the surface of the motorcycle over time by eating into the paint. Wash the motorcycle thoroughly making sure that it is completely clean before proceeding. Do not forget the tires and the leathers as well as the chrome parts. All of these need special care and attention.

Step 5: Lubricate

Lubricate the chain and everything else that needs to be lubricated, to avoid corrosion and rusting.

Step 6: Oil

Oil and the oil filter do need to be changed. These need to be changed even if you rode only a couple of kilometers since the last change. If you are storing the motorcycle for more than 4 months, you will have to change the oil again before you start riding it again. Otherwise, you are just going to ride with your winter oil on the next season (before another change of oil is needed) and it is perfectly fine.

I am assuming here that you do know how to change the oil and the filter, and I will write a separate guide someday for those who don’t.

Step 6a: Pistons

This step applies only to the cases when the motorcycle is going to be idle for more than 4 months.

Remove the spark plugs and fill a tablespoon of oil into each cylinder. Crank the engine with the starter to spread the oil evenly on the cylinder walls. This is a common and nice method to avoid rusting in the cylinders. Shut the plug holes with clean rags and take the spark plugs home.

Step 7: Battery

You generally do not have nor can you find a trickle charger in your country, so your battery is going to die and there is nothing you can do about it. But to make it less painful, you definitely want to take it off the motorcycle, take it home with you and slowly deplete it by plugging a 12V bulb or something else to the contacts.

If you have a chance to charge it with a charger once it’s depleted, and then go depleting it again, that is just wonderful (that is essentially what the trickle charger does). Otherwise, you will have to start the motorcycle with the help of another battery, charging your own from there.

Step 8: Removables

Besides removing the battery, you also want to remove the air filter and some of the leather parts, taking it all home with you. I personally remove all I can contain safer at home, including the mirrors, the leather sits of both the rider and the pillion and any accessories I have added. Some maniacs take home the entire carb and disassemble it.

Step 9: Ventilation

Close the exhaust pipe hermetically so no air gets into it causing rusting. This is an important step. Do not just stick some rugs into the hole, as clothes breathe pretty well and you do not need that. Similarly shut the air filter hole to avoid ventilation where it shouldn’t occur.

Step 10: Placement

Placement is important. Keep the motorcycle in a dark and dry place with minimal temperature variations between the day and the night. It is also very much preferred that the temperature does not get below zero.

Since you presumably do not have a motorcycle lift and CBF500 does not have a center stand by default, simply lean the motorcycle on its sidestand and make sure that the tires do not touch concrete. It is best to put sheets of thick paper under the tires to be crystal sure that no tire rotting can happen. Moving the motorcycle every 2–3 weeks a little forward and backward so the wheels don’t change their round shape under the weight is much desired.

Finally, cover the motorcycle with a blanket or a specialized motorcycle cover. Do not cover it with a plastic cover, or anything else that does not breathe and locks the moisture.